一、概述
在本教程中,我们将介绍Wire Tap 企业集成模式 (EIP),它可以帮助我们监控流经系统的消息。
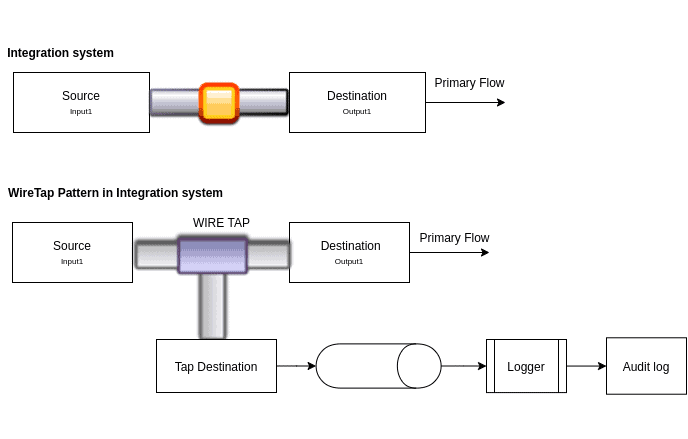
这种模式允许我们 拦截消息而无需永久地从通道中消耗它们。
2. 窃听模式
Wire Tap 检查在Point-to-Point Channel上传输的消息。它接收消息,制作副本,并将其发送到 Tap Destination:
为了更好地理解这一点,让我们使用ActiveMQ和 Camel创建一个 Spring Boot 应用程序。
3.Maven依赖
让我们添加camel-spring-boot-dependencies:
<dependencyManagement>
    <dependencies>
        <dependency>
            <groupId>org.apache.camel.springboot</groupId>
            <artifactId>camel-spring-boot-dependencies</artifactId>
            <version>${camel.version}</version>
            <type>pom</type>
            <scope>import</scope>
        </dependency>
    </dependencies>
</dependencyManagement>
现在,我们将添加camel-spring-boot-starter:
<dependency>
    <groupId>org.apache.camel.springboot</groupId>
    <artifactId>camel-spring-boot-starter</artifactId>
</dependency>
要查看流经路由的消息,我们还需要包含ActiveMQ:
<dependency>
    <groupId>org.apache.camel.springboot</groupId>
    <artifactId>camel-activemq-starter</artifactId>
</dependency>
4.消息交流
让我们创建一个消息对象:
public class MyPayload implements Serializable {
    private String value;
    ...
}
我们将此消息发送 到direct:source以启动路由:
try (CamelContext context = new DefaultCamelContext()) {
    ActiveMQConnectionFactory connectionFactory = new ActiveMQConnectionFactory("vm://localhost?broker.persistent=false");
    connectionFactory.setTrustAllPackages(true);
    context.addComponent("direct", JmsComponent.jmsComponentAutoAcknowledge(connectionFactory));
    addRoute(context);

    try (ProducerTemplate template = context.createProducerTemplate()) {
        context.start();

        MyPayload payload = new MyPayload("One");
        template.sendBody("direct:source", payload);
        Thread.sleep(10000);
    } finally {
        context.stop();
    }
}
接下来,我们将添加一条路线并点击目的地。
5.利用交易所
我们将使用 wireTap方法 来设置Tap Destination 的 端点 URI 。Camel 不会等待来自wireTap的响应,因为它将消息交换模式设置为InOnly。Wire Tap 处理器在单独的线程上处理它 :
wireTap("direct:tap").delay(1000)
Camel 的 Wire Tap 节点在窃听交换时支持两种方式:
5.1. 传统丝锥
让我们添加一个传统的 Wire Tap 路由:
RoutesBuilder traditionalWireTapRoute() {
    return new RouteBuilder() {
        public void configure() {

            from("direct:source").wireTap("direct:tap")
                .delay(1000)
                .bean(MyBean.class, "addTwo")
                .to("direct:destination");

            from("direct:tap").log("Tap Wire route: received");

            from("direct:destination").log("Output at destination: '${body}'");
        }
    };
}
在这里, Camel 只会 Exchange—— 它不会做深度克隆。 所有副本都可以共享 来自原始交换的对象。
同时处理多条消息时,有 可能破坏最终的有效负载。我们可以在将有效载荷传递到 Tap Destination 之前创建有效载荷的深层克隆,以防止这种情况发生。
5.2. 发送新的交换
Wire Tap EIP 支持Expression 或 Processor, 预填充了 exchange 的副本。Expression 只能用于设置消息正文。
Processor 变体完全控制交换的填充方式(设置属性、标头等)。
让我们 在 payload 中实现深度克隆:
public class MyPayload implements Serializable {

    private String value;
    ...
    public MyPayload deepClone() {
        MyPayload myPayload = new MyPayload(value);
        return myPayload;
   }
}
现在,让我们 使用原始交换的副本作为输入来实现Processor类:
public class MyPayloadClonePrepare implements Processor {

    public void process(Exchange exchange) throws Exception {
        MyPayload myPayload = exchange.getIn().getBody(MyPayload.class);
        exchange.getIn().setBody(myPayload.deepClone());
        exchange.getIn().setHeader("date", new Date());
    }
}
我们将在wireTap 之后使用onPrepare调用它:
RoutesBuilder newExchangeRoute() throws Exception {
    return new RouteBuilder() {
        public void configure() throws Exception {

        from("direct:source").wireTap("direct:tap")
            .onPrepare(new MyPayloadClonePrepare())
            .end()
            .delay(1000);

        from("direct:tap").bean(MyBean.class, "addThree");
        }
     };
}
六,总结
在本文中,我们实现了 Wire Tap 模式来监视通过特定消息端点传递的消息。使用 Apache Camel 的wireTap,我们消息并将其发送到不同的端点,而不改变现有的流程。
骆驼支持两种方式来点击交换。在传统的 Wire Tap中,原始交换被。第二,我们可以创建一个新的交易所。我们可以使用Expression使用消息正文的新值填充这个新的交换,或者我们可以使用Processor设置标题 -以及可选的正文。
与往常一样,本教程的完整源代码可在GitHub上获得。
Post Directory

