1. 概述
负载测试是现代企业应用程序软件开发生命周期 (SDLC) 的关键部分。在本教程中,我们将使用Postman 集合来执行简单的负载测试活动。
2.设置
我们可以下载并安装与我们系统的操作系统兼容的桌面客户端。或者,我们可以创建一个免费的 Postman 帐户并访问Web 客户端。
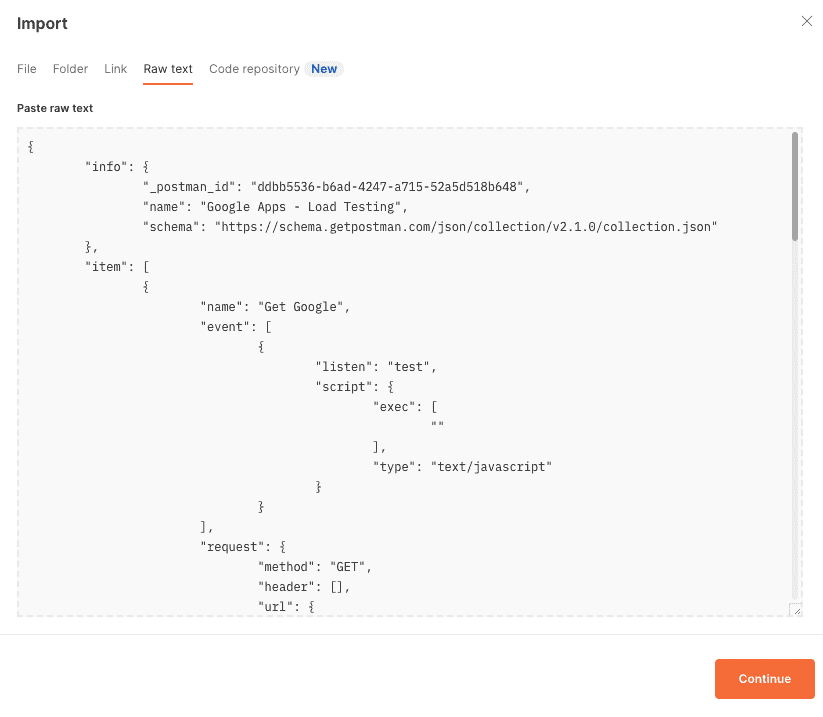
现在,让我们通过导入 Postman 的集合格式 v2.1 中可用的几个示例 HTTP 请求来创建一个名为“Google Apps – Load Testing”的新集合:
{
  "info": {
    "_postman_id": "ddbb5536-b6ad-4247-a715-52a5d518b648",
    "name": "Google Apps - Load Testing",
    "schema": "https://schema.getpostman.com/json/collection/v2.1.0/collection.json"
  },
  "item": [
    {
      "name": "Get Google",
      "event": [
        {
          "listen": "test",
          "script": {
            "exec": [
              ""
            ],
            "type": "text/javascript"
          }
        }
      ],
      "request": {
        "method": "GET",
        "header": [],
        "url": {
          "raw": "https://www.google.com",
          "protocol": "https",
          "host": [
            "www",
            "google",
            "com"
          ]
        }
      },
      "response": []
    },
    {
      "name": "Get Youtube",
      "event": [
        {
          "listen": "test",
          "script": {
            "exec": [
              ""
            ],
            "type": "text/javascript"
          }
        }
      ],
      "request": {
        "method": "GET",
        "header": [],
        "url": {
          "raw": "https://www.youtube.com/",
          "protocol": "https",
          "host": [
            "www",
            "youtube",
            "com"
          ],
          "path": [
            ""
          ]
        }
      },
      "response": []
    },
    {
      "name": "Get Google Translate",
      "event": [
        {
          "listen": "test",
          "script": {
            "exec": [
              ""
            ],
            "type": "text/javascript"
          }
        }
      ],
      "request": {
        "method": "GET",
        "header": [],
        "url": {
          "raw": "https://translate.google.com/",
          "protocol": "https",
          "host": [
            "translate",
            "google",
            "com"
          ],
          "path": [
            ""
          ]
        }
      },
      "response": []
    }
  ]
}
我们应该在导入数据时使用“原始文本”选项: 就是这样!我们只需要通过单击继续操作来完成导入任务,我们将在 Postman 中准备好我们的测试集合。
3. 使用 Postman Collection Runner
在本节中,我们将探讨如何使用Postman 的 Collection Runner 来执行“Google Apps – Load Testing”集合中的API 请求并执行基本的负载测试。
3.1. 基本配置
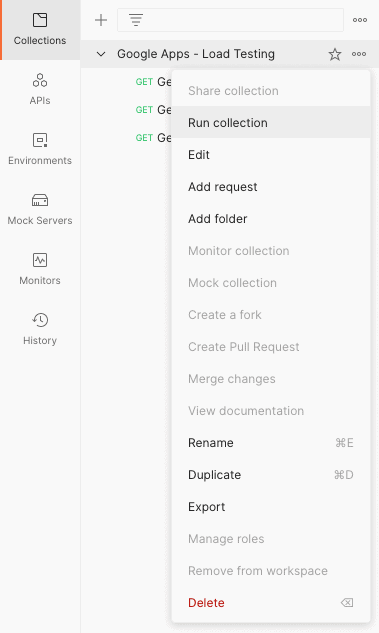
我们可以通过右键单击集合来启动 Collection Runner:
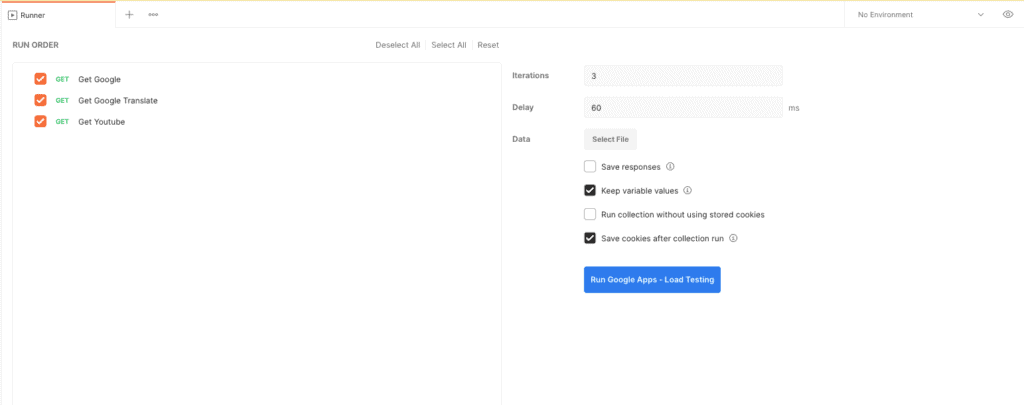
在 Runner 模式下,让我们通过指定执行顺序、迭代次数和连续 API 命中之间的延迟来配置运行:
接下来,让我们点击“Run Google Apps – Load Testing”开始对集合中的 API 请求进行基本的负载测试:
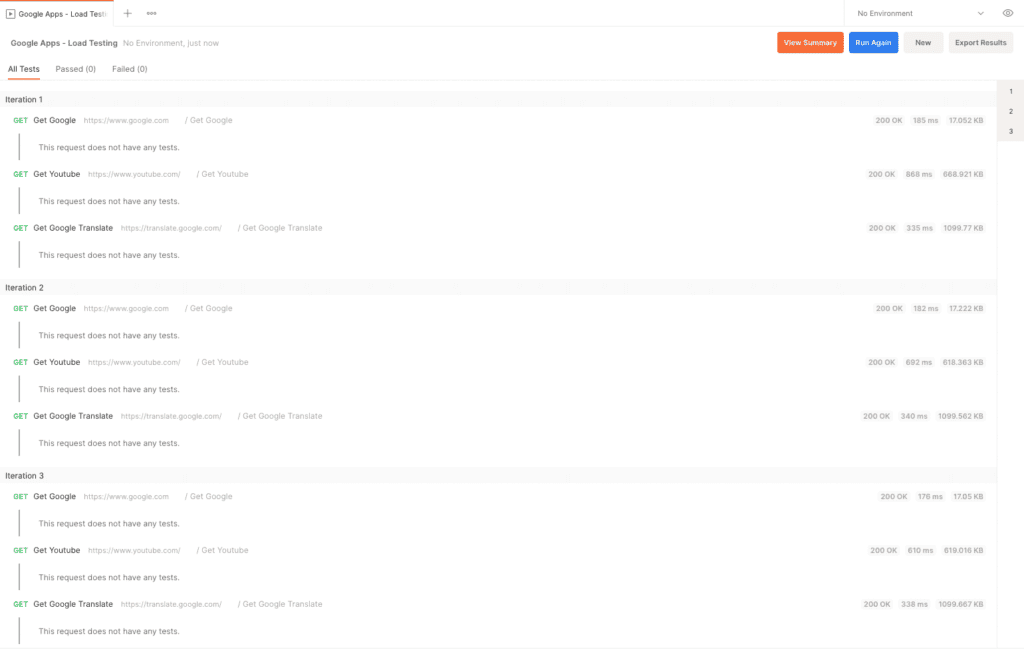
当运行器执行 API 请求时,我们可以看到跨越多个迭代的每个 API 命中的实时结果。
3.2. 使用测试脚本的高级配置
使用 Postman GUI,我们能够控制 API 的执行顺序。但是,我们可以通过使用 Postman 的测试脚本功能来更好地控制执行流程。
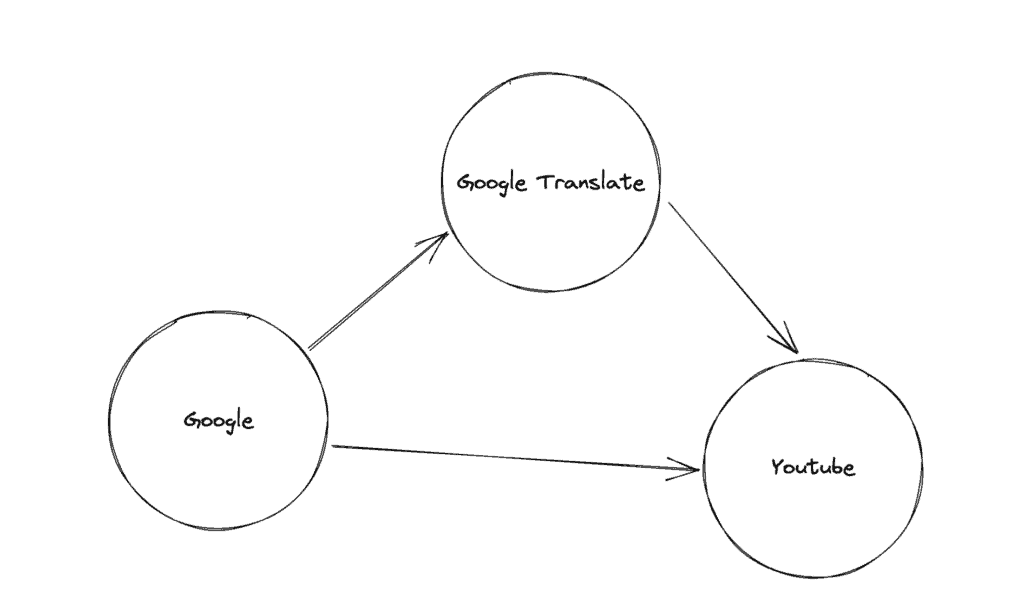
假设我们希望仅当对“Google API”的点击返回 HTTP 200状态代码时,才将“Google Translate”API 包含在工作流中。否则,我们想直接点击“Youtube API”:
我们将首先在“Get Google”请求的测试部分添加一个简单的条件语句:
if (pm.response.code == 200) {
    postman.setNextRequest("Get Google Translate");
}
else {
    postman.setNextRequest("Get Youtube");
}
接下来,我们将“Get Youtube”设置为在“Get Google Translate”之后执行的后续请求:
postman.setNextRequest("Get Youtube");
此外,我们知道“Get Youtube”是流程中的最后一个请求,因此我们将在它之后的下一个请求设置为null:
postman.setNextRequest(null);
最后,让我们看看带有测试脚本的完整集合:
{
  "info": {
    "_postman_id": "ddbb5536-b6ad-4247-a715-52a5d518b648",
    "name": "Google Apps - Load Testing",
    "schema": "https://schema.getpostman.com/json/collection/v2.1.0/collection.json"
  },
  "item": [
    {
      "name": "Get Google",
      "event": [
        {
          "listen": "test",
          "script": {
            "exec": [
              "if (pm.response.code == 200) {",
              "  postman.setNextRequest(\"Get Google Translate\");",
              "}",
              "else {",
              "  postman.setNextRequest(\"Get Youtube\");",
              "}"
            ],
            "type": "text/javascript"
          }
        }
      ],
      "request": {
        "method": "GET",
        "header": [],
        "url": {
          "raw": "https://www.google.com",
          "protocol": "https",
          "host": [
            "www",
            "google",
            "com"
          ]
        }
      },
      "response": []
    },
    {
      "name": "Get Youtube",
      "event": [
        {
          "listen": "test",
          "script": {
            "exec": [
              "postman.setNextRequest(null);"
            ],
            "type": "text/javascript"
          }
        }
      ],
      "request": {
        "method": "GET",
        "header": [],
        "url": {
          "raw": "https://www.youtube.com/",
          "protocol": "https",
          "host": [
            "www",
            "youtube",
            "com"
          ],
          "path": [
            ""
          ]
        }
      },
      "response": []
    },
    {
      "name": "Get Google Translate",
      "event": [
        {
          "listen": "test",
          "script": {
            "exec": [
              "postman.setNextRequest(\"Get Youtube\");"
            ],
            "type": "text/javascript"
          }
        }
      ],
      "request": {
        "method": "GET",
        "header": [],
        "url": {
          "raw": "https://translate.google.com/",
          "protocol": "https",
          "host": [
            "translate",
            "google",
            "com"
          ],
          "path": [
            ""
          ]
        }
      },
      "response": []
    }
  ]
}
和之前一样,我们可以使用 Collection Runner 来执行这个自定义流程。
4.使用纽曼赛跑者
我们可以使用Newman CLI 实用程序通过命令行运行 Postman 集合。采用这种方法为自动化开辟了更广阔的机会。
让我们用它来为我们现有的集合运行自定义流程的两次迭代:
newman run -n2 "Custom Flow Google Apps - Load Testing.postman_collection.json"
一旦所有的迭代都结束了,我们就会得到一个统计摘要,我们可以在其中看到请求的平均响应时间:
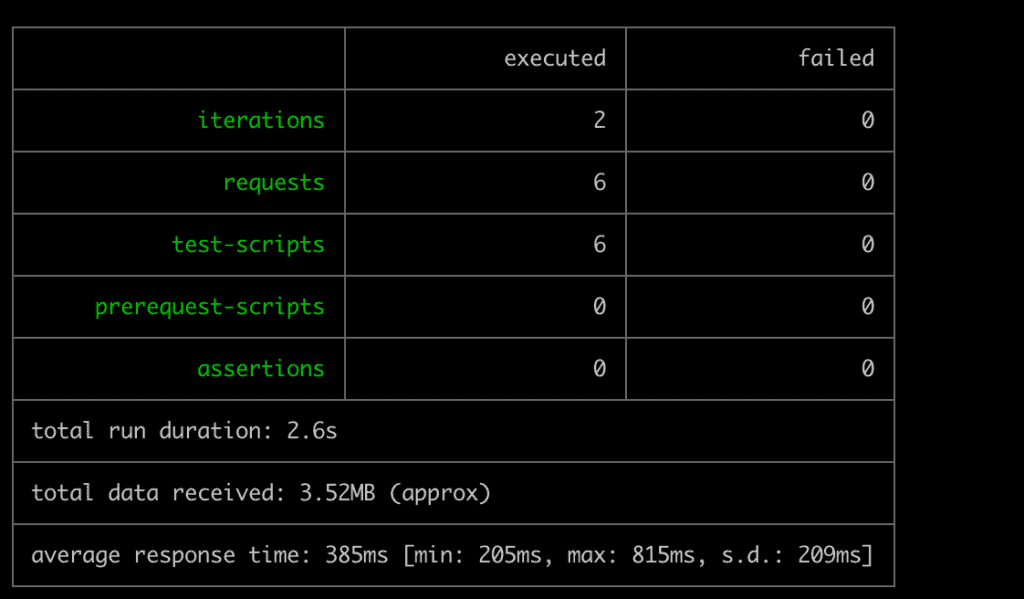
我们必须注意,我们在演示中故意使用较低的值,因为大多数现代服务都有速率限制和请求阻止逻辑,这些逻辑将开始阻止我们对较高值或持续时间的请求。
5. 使用Grafana K6
Postman 是制定请求收集和执行流程的最简单方法。但是,在使用 Postman 或 Newman 时,我们是按顺序一个接一个地调用请求。
在实际场景中,我们需要针对同时来自多个用户的请求测试我们的系统。对于这样的用例,我们可以使用Grafana 的 k6实用程序。
首先,我们需要将现有的 Postman 集合转换为 k6 兼容格式。我们可以为这个里程碑使用postman-to-k6库:
postman-to-k6 "Google Apps - Load Testing.json" -o k6-script.js
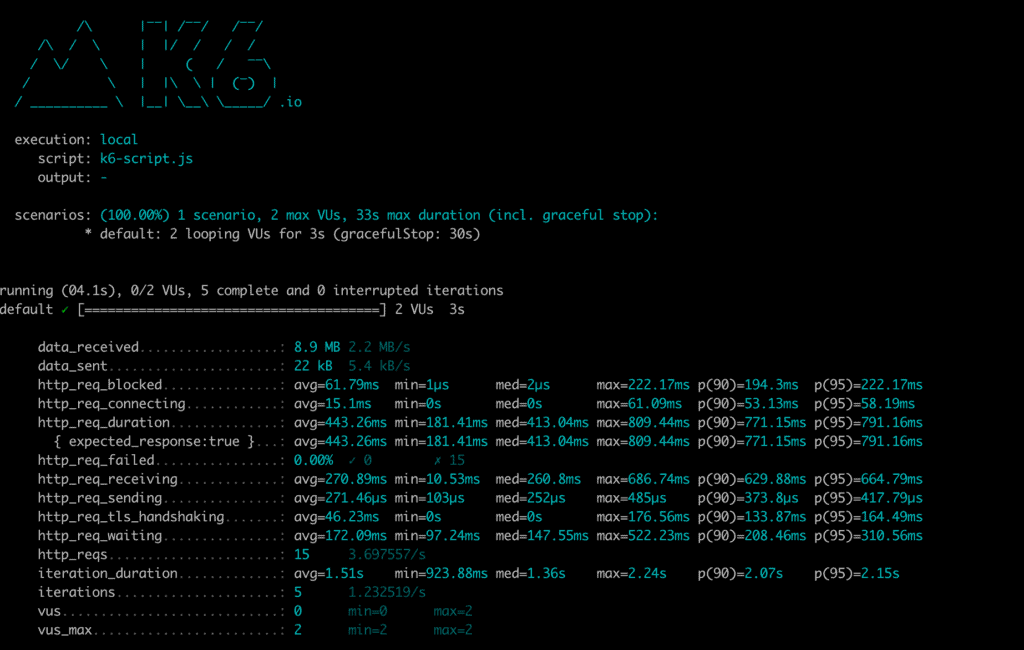
接下来,让我们用两个虚拟用户进行三秒钟的实时运行:
k6 run --duration 3s --vus 2 k6-script.js
完成后,我们会得到一份详细的统计报告,显示平均响应时间、迭代次数等指标:
六,总结
在本教程中,我们利用 Postman 集合使用 GUI 和 Newman 运行器进行基本负载测试。此外,我们了解了可用于对 Postman 集合中的请求进行高级负载测试的 k6 实用程序。
Post Directory

