1. 概述
Google Sheets提供了一种存储和操作电子表格以及与他人协作处理文档的便捷方法。
有时,从应用程序访问这些文档会很有用,例如执行自动化操作。为此,Google提供了开发人员可以与之交互的Google Sheets API。
在本文中,我们将了解如何连接到API并在Google Sheets上执行操作。
2. Maven依赖
要连接到API并操作文档,我们需要添加google-api-client、google-oauth-client-jetty和google-api-services-sheets依赖:
<dependency>
    <groupId>com.google.api-client</groupId>
    <artifactId>google-api-client</artifactId>
    <version>1.23.0</version>
</dependency>
<dependency>
    <groupId>com.google.oauth-client</groupId>
    <artifactId>google-oauth-client-jetty</artifactId>
    <version>1.23.0</version>
</dependency>
<dependency>
    <groupId>com.google.apis</groupId>
    <artifactId>google-api-services-sheets</artifactId>
    <version>v4-rev493-1.23.0</version>
</dependency>
3. 授权
我们通过应用程序访问Google Sheets API之前需要获得OAuth 2.0授权。
首先,我们需要获取一组OAuth凭证,然后在我们的应用程序中使用它来提交授权请求。
3.1 获取OAuth 2.0凭证
要获取凭据,我们需要在Google Developers Console中创建一个项目,然后为该项目启用Google Sheets API。Google快速入门指南中的第一步包含有关如何执行此操作的详细信息。
下载包含凭证信息的JSON文件后,我们将内容复制到应用程序src/main/resources目录中的google-sheets-client-secret.json文件中。
该文件的内容应类似于:
{
    "installed":
    {
        "client_id":"<your_client_id>",
        "project_id":"decisive-octane-187810",
        "auth_uri":"https://accounts.google.com/o/oauth2/auth",
        "token_uri":"https://accounts.google.com/o/oauth2/token",
        "auth_provider_x509_cert_url":"https://www.googleapis.com/oauth2/v1/certs",
        "client_secret":"<your_client_secret>",
        "redirect_uris":["urn:ietf:wg:oauth:2.0:oob","http://localhost"]
    }
}
3.2 获取Credential对象
成功授权后将返回一个Credential对象,我们可以使用该对象与Google Sheets API进行交互。
让我们创建一个GoogleAuthorizeUtil类,它有一个静态authorize()方法,该方法读取上面的JSON文件的内容并构建一个GoogleClientSecrets对象。
然后,我们将创建一个GoogleAuthorizationCodeFlow并发送授权请求:
public class GoogleAuthorizeUtil {
    public static Credential authorize() throws IOException, GeneralSecurityException {

        // build GoogleClientSecrets from JSON file

        List<String> scopes = Arrays.asList(SheetsScopes.SPREADSHEETS);

        // build Credential object

        return credential;
    }
}
在我们的示例中,我们设置了SPREADSHEETS范围,因为我们想要访问Google Sheets并使用内存中的DataStoreFactory来存储收到的凭据。另一个选项是使用FileDataStoreFactory将凭据存储在文件中。
有关GoogleAuthorizeUtil类的完整源代码,请查看GitHub项目。
4. 构建Sheets服务实例
为了与Google Sheets交互,我们需要一个Sheets对象,它是通过API进行读写的客户端。
让我们创建一个SheetsServiceUtil类,使用上面的Credential对象来获取Sheets的实例:
public class SheetsServiceUtil {
    private static final String APPLICATION_NAME = "Google Sheets Example";

    public static Sheets getSheetsService() throws IOException, GeneralSecurityException {
        Credential credential = GoogleAuthorizeUtil.authorize();
        return new Sheets.Builder(
                GoogleNetHttpTransport.newTrustedTransport(),
                JacksonFactory.getDefaultInstance(), credential)
                .setApplicationName(APPLICATION_NAME)
                .build();
    }
}
接下来,我们将了解可以使用API执行的一些最常见的操作。
5. 在工作表上写入值
与现有电子表格交互需要知道该电子表格的ID,我们可以从其URL中找到它。
为了举例,我们将使用一个名为“Expenses”的公共电子表格,位于:
https://docs.google.com/spreadsheets/d/1sILuxZUnyl_7-MlNThjt765oWshN3Xs-PPLfqYe4DhI/edit#gid=0
根据此URL,我们可以确定该电子表格的ID为“1sILuxZUnyl_7-MlNThjt765oWshN3Xs-PPLfqYe4DhI”。
此外,为了读取和写入值,我们将使用spreadsheets.values集合。
这些值表示为ValueRange对象,它们是Java对象列表的列表,对应于工作表中的行或列。
让我们创建一个测试类,在其中初始化我们的Sheets服务对象和SPREADSHEET_ID常量:
public class GoogleSheetsLiveTest {
    private static Sheets sheetsService;
    private static String SPREADSHEET_ID = // ...

    @BeforeClass
    public static void setup() throws GeneralSecurityException, IOException {
        sheetsService = SheetsServiceUtil.getSheetsService();
    }
}
然后,我们可以通过以下方式写入值:
- 写入单个范围
- 写入多个范围
- 在表格后附加数据
5.1 写入单个范围
要将值写入工作表上的单个范围,我们将使用spreadsheets().values().update()方法:
@Test
public void whenWriteSheet_thenReadSheetOk() throws IOException {
    ValueRange body = new ValueRange()
            .setValues(Arrays.asList(
                    Arrays.asList("Expenses January"),
                    Arrays.asList("books", "30"),
                    Arrays.asList("pens", "10"),
                    Arrays.asList("Expenses February"),
                    Arrays.asList("clothes", "20"),
                    Arrays.asList("shoes", "5")));
    UpdateValuesResponse result = sheetsService.spreadsheets().values()
            .update(SPREADSHEET_ID, "A1", body)
            .setValueInputOption("RAW")
            .execute();
}
在这里,我们首先创建一个包含多行的ValueRange对象,其中包含两个月的费用列表。
然后,我们使用update()方法构建一个请求,从“A1”单元格开始将值写入具有给定id的电子表格。
为了发送请求,我们使用execute()方法。
如果我们希望将值集视为列而不是行,我们可以使用setMajorDimension(“COLUMNS”)方法。
“RAW”输入选项意味着值按原样写入,而不是经过计算。
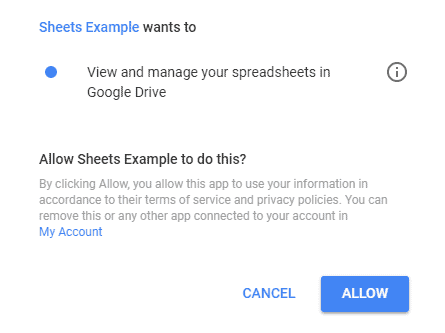
执行此JUnit测试时,应用程序将使用系统默认浏览器打开一个浏览器窗口,要求用户登录并授予我们的应用程序代表用户与Google表格交互的权限:

请注意,如果你有OAuth服务帐户,则可以绕过此手动步骤。
应用程序能够查看或编辑电子表格的前提条件是登录用户具有查看或编辑权限,否则,请求将导致403错误。我们用于示例的电子表格设置为公共编辑权限。
现在,如果我们检查电子表格,我们会看到范围“A1:B6”已使用我们的值集进行更新。
让我们继续在单个请求中写入多个不同的范围。
5.2 写入多个范围
如果我们想要更新工作表上的多个范围,我们可以使用BatchUpdateValuesRequest来获得更好的性能:
List<ValueRange> data = new ArrayList<>();
data.add(new ValueRange()
    .setRange("D1")
    .setValues(Arrays.asList(
    Arrays.asList("January Total", "=B2+B3"))));
data.add(new ValueRange()
    .setRange("D4")
    .setValues(Arrays.asList(
        Arrays.asList("February Total", "=B5+B6"))));

BatchUpdateValuesRequest batchBody = new BatchUpdateValuesRequest()
    .setValueInputOption("USER_ENTERED")
    .setData(data);

BatchUpdateValuesResponse batchResult = sheetsService.spreadsheets().values()
    .batchUpdate(SPREADSHEET_ID, batchBody)
    .execute();
在这个例子中,我们首先构建一个ValueRanges列表,每个列表由两个单元格组成,分别代表月份名称和总支出。
然后,我们创建一个BatchUpdateValuesRequest,其输入选项为“USER_ENTERED”,而不是“RAW”,这意味着单元格值将根据添加另外两个单元格的公式来计算。
最后,我们创建并发送batchUpdate请求。结果,范围“D1:E1”和“D4:E4”将被更新。
5.3 在表后附加数据
在工作表中写入值的另一种方式是将它们附加到表格的末尾。
为此,我们可以使用append()方法:
ValueRange appendBody = new ValueRange()
    .setValues(Arrays.asList(
        Arrays.asList("Total", "=E1+E4")));
AppendValuesResponse appendResult = sheetsService.spreadsheets().values()
    .append(SPREADSHEET_ID, "A1", appendBody)
    .setValueInputOption("USER_ENTERED")
    .setInsertDataOption("INSERT_ROWS")
    .setIncludeValuesInResponse(true)
    .execute();

ValueRange total = appendResult.getUpdates().getUpdatedData();
assertThat(total.getValues().get(0).get(1)).isEqualTo("65");
首先,我们构建包含要添加的单元格值的ValueRange对象。
在我们的例子中,它包含一个单元格,其中显示了我们通过添加“E1”和“E2”单元格值找到的两个月的总支出。
然后,我们创建一个请求,将数据附加到包含“A1”单元格的表格之后。
INSERT_ROWS选项表示我们希望将数据添加到新行,而不是替换表后的任何现有数据,这意味着示例将在第一次运行时写入范围“A7:B7”。
在后续运行中,从“A1”单元格开始的表格现在将延伸到包含“A7:B7”行,因此新行将转到“A8:B8”行,依此类推。
如果我们想要验证对请求的响应,我们还需要将includeValuesInResponse属性设置为true。这样,响应对象将包含更新的数据。
6. 从工作表中读取值
让我们通过从表中读取值来验证我们的值是否正确写入。
我们可以通过使用spreadsheets().values().get()方法读取单个范围或使用batchUpdate()方法读取多个范围来实现此目的:
List<String> ranges = Arrays.asList("E1","E4");
BatchGetValuesResponse readResult = sheetsService.spreadsheets().values()
    .batchGet(SPREADSHEET_ID)
    .setRanges(ranges)
    .execute();

ValueRange januaryTotal = readResult.getValueRanges().get(0);
assertThat(januaryTotal.getValues().get(0).get(0))
    .isEqualTo("40");

ValueRange febTotal = readResult.getValueRanges().get(1);
assertThat(febTotal.getValues().get(0).get(0))
    .isEqualTo("25");
在这里,我们读取范围“E1”和“E4”并验证它们包含我们之前写入的每个月的总数。
7. 创建新的电子表格
除了读取和更新值之外,我们还可以使用spreadsheets()和spreadsheets().sheets()集合来操作工作表或整个电子表格。
让我们看一个创建新电子表格的示例:
@Test
public void test() throws IOException {
    Spreadsheet spreadSheet = new Spreadsheet().setProperties(new SpreadsheetProperties().setTitle("My Spreadsheet"));
    Spreadsheet result = sheetsService
        .spreadsheets()
        .create(spreadSheet).execute();

    assertThat(result.getSpreadsheetId()).isNotNull();
}
在这里,我们首先创建一个名为“My Spreadsheet”的Spreadsheet对象,然后使用create()和execute()方法构建并发送请求。
新的电子表格将是私密的,并放置在已登录用户的云端硬盘中。
8. 其他更新操作
大多数其他操作都采用Request对象的形式,然后我们将其添加到列表中并用于构建BatchUpdateSpreadsheetRequest。
让我们看看如何发送两个请求来更改电子表格的标题并将一组单元格从一张表复制粘贴到另一张表:
@Test
public void whenUpdateSpreadSheetTitle_thenOk() throws IOException {
    UpdateSpreadsheetPropertiesRequest updateSpreadSheetRequest = new UpdateSpreadsheetPropertiesRequest().setFields("*")
            .setProperties(new SpreadsheetProperties().setTitle("Expenses"));

    CopyPasteRequest copyRequest = new CopyPasteRequest()
            .setSource(new GridRange().setSheetId(0)
                    .setStartColumnIndex(0).setEndColumnIndex(2)
                    .setStartRowIndex(0).setEndRowIndex(1))
            .setDestination(new GridRange().setSheetId(1)
                    .setStartColumnIndex(0).setEndColumnIndex(2)
                    .setStartRowIndex(0).setEndRowIndex(1))
            .setPasteType("PASTE_VALUES");

    List<Request> requests = new ArrayList<>();
    requests.add(new Request()
            .setCopyPaste(copyRequest));
    requests.add(new Request()
            .setUpdateSpreadsheetProperties(updateSpreadSheetRequest));

    BatchUpdateSpreadsheetRequest body = new BatchUpdateSpreadsheetRequest().setRequests(requests);

    sheetsService.spreadsheets().batchUpdate(SPREADSHEET_ID, body).execute();
}
在这里,我们创建一个指定新标题的UpdateSpreadSheetPropertiesRequest对象,一个包含操作源和目标的CopyPasteRequest对象,然后将这些对象添加到请求列表中。
然后,我们将这两个请求作为批量更新来执行。
许多其他类型的请求都可以以类似的方式使用。例如,我们可以使用AddSheetRequest在电子表格中创建新工作表,或者使用FindReplaceRequest更改值。
我们可以执行其他操作,例如更改边框、添加过滤器或合并单元格。请求类型的完整列表可在此处查看。
9. 总结
在本文中,我们了解了如何从Java应用程序连接到Google Sheets API,以及一些操作存储在Google Sheets中的文档的示例。
Post Directory
