1. 概述
模型上下文协议(MCP)允许AI模型通过安全的API访问业务数据,构建处理敏感信息的MCP服务器时,我们需要适当的授权来控制哪些人可以访问哪些数据。OAuth2提供了基于令牌的安全性,可以与MCP系统完美兼容。我们无需构建自定义身份验证,而是可以使用OAuth2标准来保护MCP服务器并管理客户端访问。
在本文中,我们将了解如何使用Spring AI和OAuth2保护MCP服务器和客户端的安全。我们将构建一个包含三个组件的完整示例:授权服务器、带有计算器工具的受保护MCP服务器,以及处理用户和系统请求的客户端。
2. MCP安全架构
为了确保MCP服务器的安全,了解如何在MCP服务器之前集成授权服务器非常重要。
我们的系统包含一个授权服务器,用于签发具有适当权限的JWT令牌;一个MCP服务器,用于验证令牌并控制对计算器工具的访问。此外,还有一个MCP客户端,用于获取令牌并管理不同请求类型的身份验证:
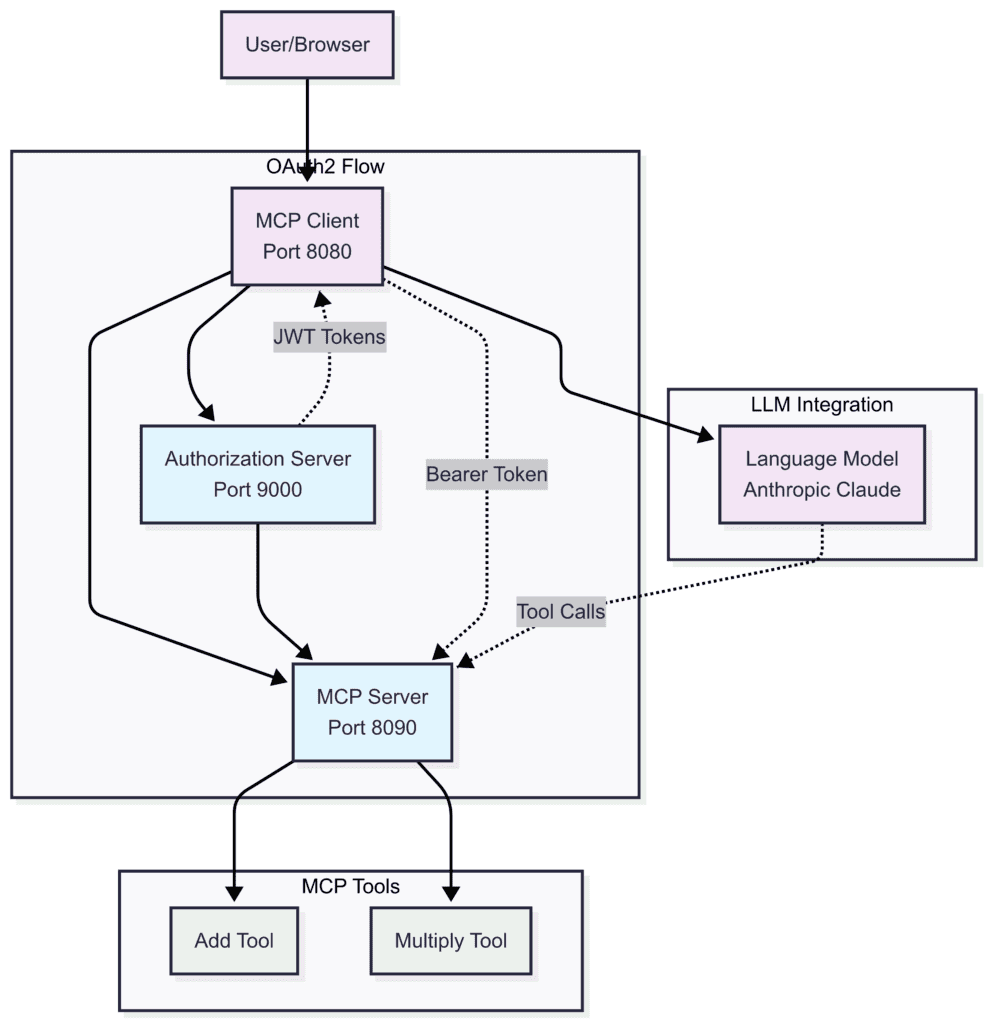
MCP服务器充当OAuth2资源服务器,它们在处理任何操作之前都会检查请求标头中的JWT令牌。这将安全问题与业务逻辑区分开来,客户端从OAuth2授权服务器获取访问令牌。然后,客户端将这些令牌包含在MCP请求中。最后,MCP服务器在允许操作之前验证令牌。
3. 构建授权服务器
我们将从授权服务器开始,因为其他组件都依赖于它。
3.1 添加依赖
我们需要添加OAuth2授权服务器依赖才能使用它:
<dependency>
    <groupId>org.springframework.boot</groupId>
    <artifactId>spring-boot-starter-oauth2-authorization-server</artifactId>
</dependency>
<dependency>
    <groupId>org.springframework.boot</groupId>
    <artifactId>spring-boot-starter-web</artifactId>
</dependency>
3.2 配置授权服务器
让我们在application.yml中配置服务器:
server:
    port: 9000

spring:
    security:
        user:
            name: user
            password: password
        oauth2:
            authorizationserver:
                client:
                    oidc-client:
                        registration:
                            client-id: "mcp-client"
                            client-secret: "{noop}mcp-secret"
                            client-authentication-methods:
                                - "client_secret_basic"
                            authorization-grant-types:
                                - "authorization_code"
                                - "client_credentials"
                                - "refresh_token"
                            redirect-uris:
                                - "http://localhost:8080/authorize/oauth2/code/authserver"
                            scopes:
                                - "openid"
                                - "profile"
                                - "calc.read"
                                - "calc.write"
这会在端口9000上设置一个授权服务器,其客户端支持授权码流(针对用户)和客户端凭证流(针对系统)。
4. 保护MCP服务器
现在我们将创建一个需要OAuth2令牌并提供计算器工具的MCP服务器。
4.1 配置MCP服务器依赖
现在,让我们添加OAuth2资源服务器支持:
<dependency>
    <groupId>org.springframework.ai</groupId>
    <artifactId>spring-ai-starter-mcp-server-webmvc</artifactId>
    <version>1.0.0-M7</version>
</dependency>
<dependency>
    <groupId>org.springframework.boot</groupId>
    <artifactId>spring-boot-starter-oauth2-resource-server</artifactId>
</dependency>
4.2 服务器配置
让我们将MCP服务器配置为OAuth2资源服务器:
server.port=8090

spring.security.oauth2.resourceserver.jwt.issuer-uri=http://localhost:9000

spring.ai.mcp.server.enabled=true
spring.ai.mcp.server.name=mcp-calculator-server
spring.ai.mcp.server.version=1.0.0
spring.ai.mcp.server.stdio=false
当我们设置颁发者URI时,Spring Boot会自动处理JWT验证。现在,每个发送到MCP服务器的请求都需要在Authorization标头中携带有效的JWT令牌。
4.3 创建MCP工具
LLM学生通常数学不好,因此,我们需要为他们提供一些工具,让他们能够根据需求计算结果:
@Tool(description = "Add two numbers")
public CalculationResult add(
        @ToolParam(description = "First number") double a,
        @ToolParam(description = "Second number") double b) {
    double result = a + b;
    return new CalculationResult("addition", a, b, result);
}

@Tool(description = "Multiply two numbers")
public CalculationResult multiply(
        @ToolParam(description = "First number") double a,
        @ToolParam(description = "Second number") double b) {
    double result = a * b;
    return new CalculationResult("multiplication", a, b, result);
}
安全配置会自动保护所有MCP工具,没有有效令牌的请求将被拒绝。这些工具会被添加到上下文中,并在每次用户查询时提供给LLM。然后,LLM会决定使用哪个工具来响应用户查询。
5. 构建MCP客户端
现在,我们需要客户端处理最复杂的部分,因为它需要处理用户请求和系统初始化。
5.1 客户端依赖
我们首先添加mcp-client和oauth2-client依赖:
<dependency>
    <groupId>org.springframework.ai</groupId>
    <artifactId>spring-ai-starter-mcp-client-webflux</artifactId>
</dependency>
<dependency>
    <groupId>org.springframework.boot</groupId>
    <artifactId>spring-boot-starter-oauth2-client</artifactId>
</dependency>
5.2 客户端配置
现在,我们需要在application.properties中配置两个OAuth2客户端注册:
server.port=8080

spring.ai.mcp.client.sse.connections.server1.url=http://localhost:8090
spring.ai.mcp.client.type=SYNC

spring.security.oauth2.client.provider.authserver.issuer-uri=http://localhost:9000

# OAuth2 Client for User-Initiated Requests (Authorization Code Grant)
spring.security.oauth2.client.registration.authserver.client-id=mcp-client
spring.security.oauth2.client.registration.authserver.client-secret=mcp-secret
spring.security.oauth2.client.registration.authserver.authorization-grant-type=authorization_code
spring.security.oauth2.client.registration.authserver.provider=authserver
spring.security.oauth2.client.registration.authserver.scope=openid,profile,mcp.read,mcp.write
spring.security.oauth2.client.registration.authserver.redirect-uri={baseUrl}/authorize/oauth2/code/{registrationId}

# OAuth2 Client for Machine-to-Machine Requests (Client Credentials Grant)
spring.security.oauth2.client.registration.authserver-client-credentials.client-id=mcp-client
spring.security.oauth2.client.registration.authserver-client-credentials.client-secret=mcp-secret
spring.security.oauth2.client.registration.authserver-client-credentials.authorization-grant-type=client_credentials
spring.security.oauth2.client.registration.authserver-client-credentials.provider=authserver
spring.security.oauth2.client.registration.authserver-client-credentials.scope=mcp.read,mcp.write

spring.ai.anthropic.api-key=${ANTHROPIC_API_KEY}
我们需要两个注册来对应不同的身份验证流程,authserver注册使用授权码流程来处理用户发起的请求,authserver-client-credentials注册使用客户端凭据流程来处理系统启动。
5.3 安全配置
现在让我们设置Spring Security来处理OAuth2:
@Bean
WebClient.Builder webClientBuilder(McpSyncClientExchangeFilterFunction filterFunction) {
    return WebClient.builder()
            .apply(filterFunction.configuration());
}

@Bean
SecurityFilterChain securityFilterChain(HttpSecurity http) throws Exception {
    return http.authorizeHttpRequests(auth -> auth.anyRequest().permitAll())
            .oauth2Client(Customizer.withDefaults())
            .csrf(CsrfConfigurer::disable)
            .build();
}
5.4 选择正确的Token
这里的全部挑战在于为每个请求选择正确的令牌,我们需要一个自定义的ExchangeFilterFunction实现来检测请求上下文:
@Component
public class McpSyncClientExchangeFilterFunction implements ExchangeFilterFunction {

    private final ClientCredentialsOAuth2AuthorizedClientProvider clientCredentialTokenProvider = new ClientCredentialsOAuth2AuthorizedClientProvider();
    private final ServletOAuth2AuthorizedClientExchangeFilterFunction delegate;
    private final ClientRegistrationRepository clientRegistrationRepository;
    private static final String AUTHORIZATION_CODE_CLIENT_REGISTRATION_ID = "authserver";
    private static final String CLIENT_CREDENTIALS_CLIENT_REGISTRATION_ID = "authserver-client-credentials";

    public McpSyncClientExchangeFilterFunction(OAuth2AuthorizedClientManager clientManager,
                                               ClientRegistrationRepository clientRegistrationRepository) {
        this.delegate = new ServletOAuth2AuthorizedClientExchangeFilterFunction(clientManager);
        this.delegate.setDefaultClientRegistrationId(AUTHORIZATION_CODE_CLIENT_REGISTRATION_ID);
        this.clientRegistrationRepository = clientRegistrationRepository;
    }

    @Override
    public Mono<ClientResponse> filter(ClientRequest request, ExchangeFunction next) {
        if (RequestContextHolder.getRequestAttributes() instanceof ServletRequestAttributes) {
            return this.delegate.filter(request, next);
        }
        else {
            var accessToken = getClientCredentialsAccessToken();
            var requestWithToken = ClientRequest.from(request)
                    .headers(headers -> headers.setBearerAuth(accessToken))
                    .build();
            return next.exchange(requestWithToken);
        }
    }

    private String getClientCredentialsAccessToken() {
        var clientRegistration = this.clientRegistrationRepository
                .findByRegistrationId(CLIENT_CREDENTIALS_CLIENT_REGISTRATION_ID);

        var authRequest = OAuth2AuthorizationContext.withClientRegistration(clientRegistration)
                .principal(new AnonymousAuthenticationToken("client-credentials-client", "client-credentials-client",
                        AuthorityUtils.createAuthorityList("ROLE_ANONYMOUS")))
                .build();
        return this.clientCredentialTokenProvider.authorize(authRequest).getAccessToken().getTokenValue();
    }

    public Consumer<WebClient.Builder> configuration() {
        return builder -> builder.defaultRequest(this.delegate.defaultRequest()).filter(this);
    }
}
过滤器会检查是否存在活动的Web请求,如果存在,则使用用户的授权码令牌;如果不存在(例如在应用启动时),则使用客户端凭据。
6. 使用安全的MCP系统
现在我们已经涵盖了所有组件,让我们看看如何有效地使用安全的MCP系统。
6.1 创建聊天客户端
让我们用ChatClient将所有内容连接在一起:
@Bean
ChatClient chatClient(ChatClient.Builder chatClientBuilder, List<McpSyncClient> mcpClients) {
    return chatClientBuilder.defaultToolCallbacks(new SyncMcpToolCallbackProvider(mcpClients))
        .build();
}
6.2 发起请求
现在我们可以正常使用ChatClient了,安全机制会自动生效:
@GetMapping("/calculate")
public String calculate(@RequestParam String expression, @RegisteredOAuth2AuthorizedClient("authserver") OAuth2AuthorizedClient authorizedClient) {
    String prompt = String.format("Please calculate the following mathematical expression using the available calculator tools: %s", expression);

    return chatClient.prompt()
        .user(prompt)
        .call()
        .content();
}
在启动过程中,MCP客户端初始化使用客户端凭证令牌。当用户通过Web界面发出请求时,MCP客户端会使用其授权码令牌。
7. 验证设置
为了理解该应用程序的工作原理,我们需要研究它产生的结果。在启动任何应用程序之前,我们必须为LLM设置所需的环境变量。设置完成后,我们首先在端口9000上启动授权服务器。这一点很重要,因为所有其他模块都依赖于授权服务器。然后,我们在端口8090上启动MCP服务器,接着在端口8080上启动MCP客户端。
测试整个流程变得简单,我们需要访问MCP客户端,然后尝试以下操作:
http://{base_url}:8080/calculate?expression=15+25
客户端将从授权服务器获取令牌,使用该令牌调用MCP服务器,并返回计算结果,我们必须确保使用配置文件中指定的凭据登录授权服务器。
8. 总结
在本教程中,我们探讨了OAuth2如何通过基于标准令牌的授权为MCP系统提供强大的安全性。Spring Security的OAuth2支持能够以最少的配置提供良好的保护。通过分离授权服务器、MCP服务器和MCP客户端,我们创建了一个架构,每个组件都专注于各自的职责,从而提高了灵活性。
Post Directory
